| Game | Walkthrough | Gallery | Soundtrack | Changelog | References | Theories |
|---|
Complete walkthrough for Broken Bottles (Version 0.03 & effects for Version 0.02).
Flowchart[]
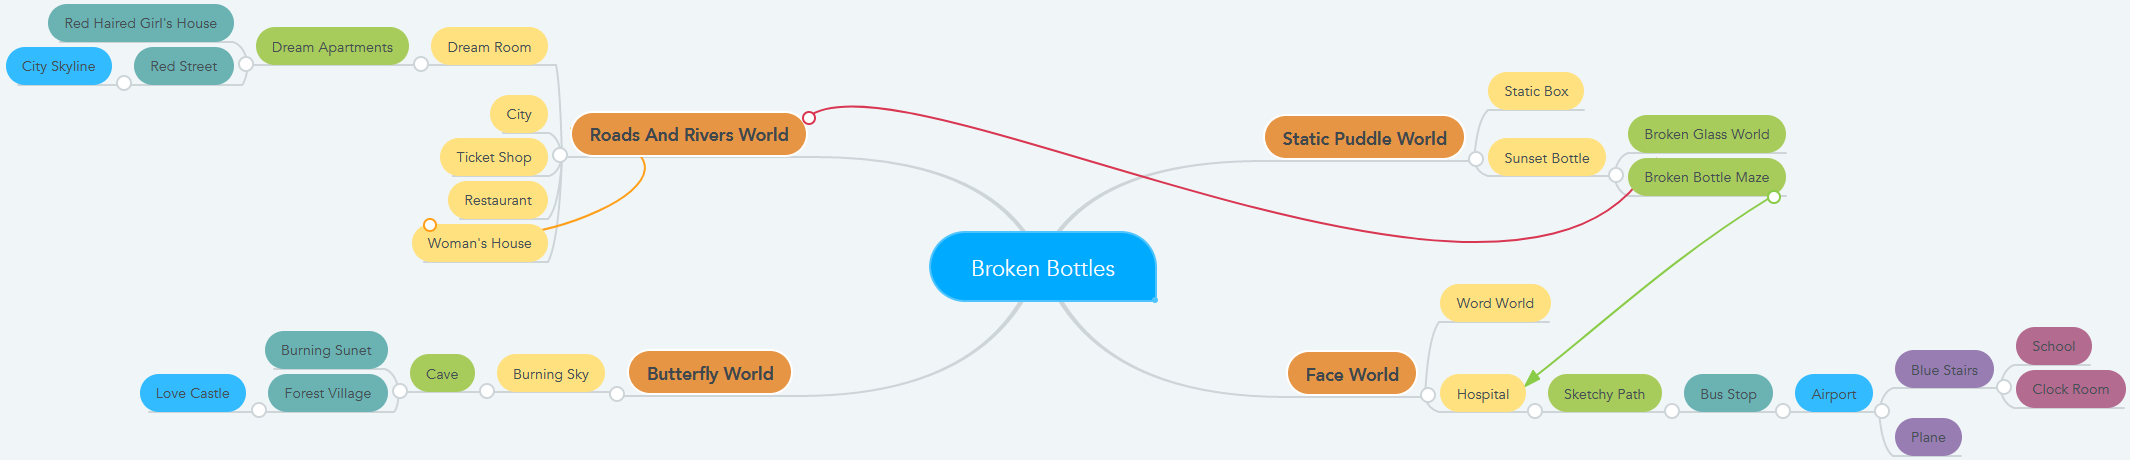
Effects Guide - Version 0.03[]
Skull[]
Your head becomes a dreadful skull

Appearance: Dokutsuki's head is replaced with a skull.
Passive Effect: None.
Action: (Shift) Dokutsuki pops her head off for a second.
Location: Found in the Static Puddle (Boom) World.
Practical Uses: None.
Enter the star door to Static Puddle (Boom) World. Go north-west (more west than north) from the door and interact with the skull on the ground.
Glass Shard[]
A glass shard to puncture organisms

Appearance: Dokutsuki holds a glass shard.
Passive Effect: None.
Action: (Shift) Dokutsuki twirls the glass shard in the air. (Z) When interacting with NPCs, Dokutsuki will attack them with the glass shard.
Location: Found in the Broken Glass area.
Practical Uses: Allows Dokutsuki to kill certain NPCs and gain access to certain areas/events.
Enter the star door to Static Puddle (Boom) World. Go down from the door until you reach a brown door. Go right past that door until you see a red building just below you. Go down and step in front of the building.
Go left past the large bottle into the Broken Glass area. Go right and down from the two large bottles to an NPC weeping beside a corpse. Interact with the corpse.
Voiceless[]
.....

Appearance: Dokutsuki's mouth is covered.
Passive Effect: None.
Action: (Shift) Dokutsuki brings her hands to whatever's covering her mouth, then shakes her head.
Location: Found in the Words World.
Practical Uses: None.
Enter the brown door on the right to Faces World. Go north from the door and watch out for two gagged yellow faces with the word "WHAT" above them. Go between these faces and enter Words World. Interact with another gagged face in this world to receive this effect.
Bandages[]
To put on when you're hurt

Appearance: Dokutsuki wears bandages on her head.
Passive Effect: None.
Action: None.
Location: Found in the Dark Hospital.
Practical Uses: None.
(Jetpack Effect is recommended.)
Enter the star door to Static Puddle (Boom) World. Go south-east and enter the red building. go left, break the giant bottle by interacting with it and go inside. In the maze go down, left until you hit a wall, down again and up, enter the door. Go up through the door in the first room. Take the top-most door down the hall in the next room. Take the second door on the left in the hallway, then take the top-most door in the next room.
Go up to a dark hallway. Navigate to the bottom-right corner of this area and go along a winding hallway to another room. Go throught the door at the bottom of the room and interact with a bandaged woman at the end of the hallway to get the effect. A chaser will appear after getting this effect, who can easily be outrun with the Jetpack.
Clock-Head[]
Your head is a stopwatch.

Appearance: Dokutsuki's head is replaced with a stopwatch.
Passive Effect: None.
Action: (Shift) Time stops, changing the appearance of certain NPCs/objects.
Location: Found in the Clock-Hand Hallway.
Practical Uses: Can be used to access hidden/unique dialogue.
Enter the Static Puddle (Boom) World. Go south-east and enter the red building. Break the bottle on the left and go inside. In the maze go down, left to the end, down again and up, enter the door. Enter the only door in the new area, go up and along the hallway, enter the door at the end of it. Now, take the second door at the left side of the hallway. Keep going up until you find yourself in a narrow path. Walk this path then go right until you find a door you can enter next to a table.
Enter the door. You should be in the room with a NPC. Interact with the small plane beside the NPC. Walk the path and interact with the face at the end. You should be at the bus station. Get the Bus Ticket. Enter the second bus and talk to the driver to arrive at the airport entrance. Go up. In the new area go right and down the stairs, enter the third door there. Go to the next area. Keep going left and entering new areas until you find a set of stairs which resemble a triangle. Take the stairs up and interact with the clock. Enter the room to the right and keep going the hallway until you can get the effect.
Medusa[]
Have snakes for hair.

Appearance: Dokutsuki's hair is replaced with snakes.
Passive Effect: None.
Action: (Shift) Dokutsuki opens her eyes, causing NPCs to freeze.
Location: Found in the Judgement Maze.
Practical Uses: Stops NPCs movement.
Follow the walkthrough for the Clock-Head effect up until you find the blue stairs area. There you will need to interact with purple hands. There are a total of five of them and can be found roughly like this (note: the entrance is the beginning of the blue stairs area where a green eye on the wall can be seen):
- first area after the entrance: up->all the way to the left->keep going down
- first area after the entrance: take stairs to the left->stairs down
- second area after the entrance: go left until the statue->go down
- third area after the entrance: enter the door
- fifth area after the entrance: near a blue blob
Afterwards interact with the statue (you may need to do it twice). Go up and interact with a different statue to obtain the effect.
Jetpack[]
You equip a jetpack.

Appearance: Dokutsuki rides around on a jetpack.
Passive Effect: Dokutsuki's movement speed increases.
Action: None.
Location: Found in the Roads and Rivers World.
Practical Uses: Used to travel through the dream world faster and out-speed chasers.
Enter the green door to Roads and Rivers World. Take the path going up then go right until you reach a dead end. Interact with the jetpack on the ground.
Little Girl[]
Just like old times.

Appearance: Dokutsuki becomes a little girl.
Passive Effect: None.
Action: (Shift) Dokutsuki starts crying, making NPCs move towards her.
Location: Found in Dokutsuki's Dream House.
Practical Uses: Can be used to move NPCs blocking your path.
Enter the green door to Roads and Rivers World. Go east, then south, and follow the path until you reach a rope point. Use the Rope to climb down. Proceed south (there are many immediate paths, but none of them lead anywhere; getting lost here is almost impossible) and turn right at the only detour. Follow this path to another room and enter the doorway on the north wall.
Go all the way north and interact with the glowing dot to be transported to Dokutsuki's Dream House. Enter the door on the left to Dokutsuki's room, and ascend the stairs. Go through the third door from the left and interact with the two women in the center (implied to be a younger Dokutsuki and her mother).
Fire Hair[]
Your hair becomes fire. Light up your surroundings

Appearance: Dokutsuki wears a red headdress and outfit.
Passive Effect: Lights up dark areas.
Action: None.
Location: Found at the Campfire Gathering.
Practical Uses: Makes navigating through dark areas easier.
Follow the walkthrough to obtain the Ticket. Afterwards, return to the house you passed before, go inside and travel east to a new area. Navigate the paths south, and when you reach the red carpet, turn west. Follow the carpet to the campfire. Interact with the person behind the desk to show them your ticket and be admitted. After the event with The Girl, interact with her again.
Shadow[]
Become a shadow of yourself.

Appearance: Dokutsuki turns into a shadow.
Passive Effect: None.
Action: (Shift) Dokutsuki returns to the Nexus.
Location: Found in the Butterfly World.
Practical Uses: Used to quickly return to the Nexus.
Enter the flower door to Butterfly World. Go up until you reach a square formation of four large tiles, each with a butterfly flying inside, connected by a series of smaller tiles. Move east until you see the shadow of a girl flying a kite approaching you. Interact with the girl (she is not solid, so mashing the interact button is a good course of action here).
Scientist[]
Become a scientist; a dream come true.

Appearance: Dokutsuki dresses as a scientist.
Passive Effect: None.
Action: (Shift) Dokutsuki checks her pulse.
Location: Found in the Lonely Girl's Home.
Practical Uses: None.
Follow the walkthrough for the Medusa effect up until the end, afterwards go up and enter the house. In the house take the right path, then take the north one and walk the hallway. Now walk the spiral-like hallway up to the end and enter the door. In the room interact with the lab coat lying on the floor to get the effect.
Items[]
Key 1[]
What is this for?
It is received from the object in the bottom left corner of the Dream Courtyard. Used to access the Static Box event in Static Puddle (Boom) World.
Key 2[]
The key to one of the terminals.
It is received from the pink security person at the Airport, and allows you to board one of the flights and view the Plane Crash event.
Key 3[]
A very small key.
It can be found by searching the dead dog found on the way to the Little Girl effect. It can be used on the picture of little Dokutsuki in Dokutsuki's Dream House to trigger the Little Girl event.
Bus Ticket[]
Give to the Driver.
(Glass Shard effect is recommended for getting this item.)
It is found in the bottom-right of the room filled with monsters west of the Bus Station, and grants access to the Bus Ride event and, consequently, the Airport.
Rope[]
A seemingly endless string of sturdy rope.
An item only obtainable in v0.03. Obtained by cutting down the girl stuck in the tree in the Roads and Rivers World. Used to gain access to other areas.
Go right from the Nexus door in Roads and Rivers World until you reach a house. Enter it from either entrance and go into the southwestern room. Interact with the glowing dot to be teleported to an isolated part of Roads and Rivers World. Go east, talk to the girl suspended by a rope, go the rest of the way east, and cut the rope using the Glass Shard effect, freeing the girl. Collect the rope off the ground.
If you leave the rope bridging two areas and wake up without collecting it, it will disappear, but a replacement can be found beside the aforementioned girl.
Ticket[]
A ticket for a campfire gathering.
Allows you to access the campfire in Roads and Rivers World.
Go right from the Nexus door in Roads and Rivers World until you reach a house. Go north from the house and enter the door beneath the sign. Interact with the ticket on the table and buy it for 50G.
Medicine[]
Medicine. You don't know what it does.
(v0.03) Found in the same room the Scientist effect can be found in. Can be given to the Sickly Girl in the same house you find the medicine in.
Events[]
Static Box[]
After getting Key 1, enter Static Puzzle (Boom) World and travel directly south from the Nexus door. Enter the brown door into a brown room. Ascend the stairs and interact with the box. Dokutsuki will unequip any effect she might be using and kneel down to look at the box. The box will open, Dokutsuki's face will disappear, apparently covered in shadow, and she will begin crying as bursts of static cover the screen. After a couple seconds, she will stop crying and wipe away her tears, gaining a wide grin (but no eyes) and stopping the static.
Press the interact button again to stand up, causing another brown door to appear in the corner of the room. The door is a one-way exit to the place housing the Glass Shard effect (which is located just to the left of the drop-off point). Dokutsuki will refuse to enter the brown door in Static Puddle (Boom) World from then on.
Bus Ride[]
Approaching the driver of the second bus in the Bus Station and sitting down will make the bus go dark, rumble, and drive the player to the Airport.
Plane Crash[]
Similarly, upon getting Key 2, the player can board the furthest plane in the flight area of the Airport. Upon entering the plane, a woman will tell Dokutsuki the flight is full and that she must get off, urging her to use the bathroom first. Using the glass shard effect, the patrons lining in front of the bathroom can be killed to get access to the latrines, though these have no effect. Finding the pilot at the front of the plane initiates a rather rude conversation in which he tells you to board the next flight. When the player at last leaves the plane to re-enter the waiting area, an announcement will play, indicating that the plane has crashed. The room will suddenly turn red with a change of music and all the NPCs that are passive chasers will activate and chase you. (It is advised to see every other event before this as some events will be near impossible to complete)
Little Girl[]
After getting Key 3, follow the walkthrough for the Little Girl effect until you get to the hall in Dokutsuki's Dream House. Go all the way to the right and descend the stairs. Go right until you reach a crossroads with a sane chaser, then go up until you reach a picture of a young, smiling Dokutsuki. Interact with the picture to enter a dark room. Dokutsuki is using the Little Girl effect, and the menu will not open. The way back doesn't work. Walking north through the narrow passageway leads you to a sitting girl with red hair and a pink dress. Talking with her will start the event, the transcript of which is below:
| Spoiler warning: Plot or ending details follow. |
|---|
Girl: "Oh hi! Are you ready to play?"
[Screen blackens. When it lights up again, Dokutsuki is seated on the cushion in the rooms middle, her eyes closed. The Girl looks at her from the left before walking behind her.]
Girl: "How is it? I like doing your hair."
"I've been waiting for you for a long time."
"We used to play all the time. But then..."
[Dokutsuki opens one eye. The Girl's face disappears, as if cloaked by shadow.]
Girl: "You didn't save me..."
"How could you leave me behind?! You weren't competent enough to save even one person... A failure."
[The Girl draws a knife and raises it above her head.]
Girl: "It's your fault that I... that I..."
[The Girl suddenly gains a wide, unnatural smile. She laughs ominously. Dokutsuki recoils, giving a cry of fear. The screen cuts to black with the sound of a stab.]
[Unspecified person]: "Forgive me..."
[Dokutsuki automatically wakes up upon this event's conclusion.]
This event can only be triggered once.
The Story of Girl[]
Follow the walkthrough for the Little Girl event until you reach the picture of young Dokutsuki. Go left and down to the door beyond the table. Walk to the right and interact with the mirror with the reflection of a girl who is not Dokutsuki, and you will enter a segment where you play as this unknown Girl, the same as the one from the Little Girl event. The Girl has a menu and can wake up, but cannot use effects. Her name is listed as simply "Girl", and she has the same "Late Bloomer" status as Dokutsuki. Unlike other such events, the player can return to Dokutsuki at any time by interacting with the mirror beside where The Girl's segment starts.
Walk to the right and enter the second building (the first is locked). Follow the halls inside to the green door at the end (the other paths end in rooms with at least one point of interest each). Walk to the end of the hall past the door and press the interact button while standing at the center of the circular symbol to be transported to the Vignette Anterooms.
Each anteroom consists of a small vestibule that contains the room's number on a sign, a glowing dot that allows you to return to the previous room, a northern passage to a vignette, and a circular symbol that takes you to the next anteroom.
| Spoiler warning: Plot or ending details follow. |
|---|
Vignette 1[]
A room with a green floor and sky-print curtained walls. The Girl stands on the left side of the T-shaped room, a young Dokutsuki on the right.
Transcript:
[The Girl and young Dokutsuki approach each other simultaneously, but hesitantly. Soon, they are only one tie apart.]
Girl: "Hey... I've heard about you."
Dokutsuki: "Really? What did you hear about me?"
Girl: "That you're really weird, and that I should stay away from you and your family."
Dokutsuki: "Oh... well, it's true. Now would you please go aw-"
Girl: "But that just makes me even more curious. You're special, in a good way. I can feel it."
Dokutsuki: "..."
Girl: "Why the long face?"
[The Girl walks forward one tile.]
Dokutsuki: "Stay away from me."
[Dokutsuki turns away from The Girl and walks another tile away. The Girl follows. Dokutsuki turns around again.]
Girl: "Nah..."
Dokutsuki: "You're a really dumb person."
[After this, the vignette ends. The Girl can now interact with both of the vignette actors again for another line each.]
Dokutsuki (interact after vignette): "You're a really dumb person."
Girl (interact after vignette): "I know."
Vignette 2[]
A small room with very short walls, with just enough floor to hold a circular symbol (and what appear to be a couple of red bottles). The Girl and Dokutsuki (in a different scale and outfits than usual) are surrounded by three chasers and the wall at their backs. Dokutsuki is sitting down, while The Girl stands beside her defiantly. To the right of the room is an isolated tile with young Dokutsuki's head on it facing north.
Transcript:
Girl (narrating): "[The rumors were true. She was a little weird and had some interesting hobbies, but she was a nice person.]"
"[We became fast friends, and she would always rely on me for protection.]"
"[Why would she need protection? Well, she was smart, but she was a little lacking in physical fitness.]"
"[I never liked her father, but she loved him. Whenever things got a little rowdy, her mother and I would always come to her side.]"
"[She was truly sheltered, and I'm partly to blame for her rash actions that would result from her up-bringing.]"
"[But I will always protect her... I don't know why... I guess I like to be seen as the hero.]"
"[Years passed and nothing changed, or at least I wanted to believe that nothing had changed.]"
"[The answer would come soon enough...]"
[After this, the vignette ends. The Girl can now interact with the chasers for a line each.]
Leftmost chaser: "And you say I'M creepy..."
Bottommost chaser: "Why?"
Rightmost chaser: "..."
Vignette 3[]
A small, desaturated room with an X-shaped pattern of green tiles on a floor of brown tiles. The wall is an eclectic mix of the usual pink-with-dots wallpaper and the sky-print curtains. At the room's center stand three people facing the south wall: The Girl, an unknown girl with black hair, a black-and-gray striped dress, and red shoes, and young Dokutsuki (listed from left to right). The girl in black stands at the center of the tile X. She and Dokutsuki have no faces.
Transcript:
Girl (narrating): "[After we got used to each other and Dokutsuki opened up little by little, we met another interesting person.]"
"[We didn't know her name, but she said that she was sick of being alone. So we took her in and welcomed her. At least I did.]"
"[Dokutsuki couldn't seem to trust her for some reason, but I brushed off her suspicions.]"
"[The little girl usually sulked in a corner, muttering to herself. I didn't know what she was muttering about, but I just let her be.]"
[The screen darkens to black.]
Girl (narrating): "[And then she just... disappeared.]"
[The screen fades back in again. The Girl and Dokutsuki are unchanged, but the girl in black is gone.]
Girl (narrating): "[She left one day and we never saw her again. Dokutsuki seemed to know something about her disappearance, but she wouldn't tell me anything.]"
"[I just wish that she could trust me... Her untrustworthiness is one of her many annoying traits.]"
[After this, the vignette ends. Interacting with Dokutsuki does nothing, but The Girl has a line.]
Girl (interact after vignette): "..."
Vignette 4[]
(The anteroom for this vignette has a western detour, but a white figure blocks it.
White figure: "Come back after your trip is complete...")
This room's structure is unusual. It consists of two small rooms connected with a hall, neither part with decor different from the bulk of the area. The first room contains The Girl, staring northward. She can be interacted with.
Girl: "..."
In the second room, Dokutsuki (now the same age and outfit as the one controlled in the rest of the game) is kneeling over a chemistry set, surrounded by a few piles of blue and green broken glass. Entering this room will trigger the vignette.
Transcript:
Girl (narrating): "[She wasn't like she was before. After that girl disappeared, bad things kept happening.]"
"[I loathed her. It seemed like she was the cause of all of Dokutsuki's misfortune.]"
"[After that one incident... she was lost, he was lost...]"
"[I was on the sidelines, watching them mourn. I didn't see her family as often, and something seemed missing.]"
"[They wouldn't tell me what they were grieving over, but I could tell...]"
"[Dokutsuki started locking herself in her room and picked up some hobbies that were even stranger than the ones she had before.]"
"[I felt like I was the only one keeping her from disappearing completely, so I tried my best.]"
"[I'm just so tired...]"
[After this, the vignette ends. The Girl can now interact with Dokutsuki for a new line. Strangely, Dokutsuki is labeled "???" in the textbox.]
Dokutsuki (interact after vignette): "I..."
Girl (narrating): [She's mumbling to herself.]"
Vignette 5[]
Unlike the cutscene-like style of the previous four vignettes, this segment only has a couple of NPCs to interact with.
This room has three portions. Each room has green tile floors. The first portion is directly connected to the other two and has the usual pink-with-dots design. The other two portions have sky-pattern curtained walls.
The leftmost portion contains a man and a woman holding hands. The man has no face, and the woman only has a smile. Judging by their hairstyles, they are younger versions of Dokutsuki's parents.
Transcript (interact with woman):
Woman: "Hehe, I'm so glad to be with you."
Man: "I'm glad you think that way, honey... You always bring out the best in me."
Woman: "Haha, oh..."
Transcript (interact with man):
Woman: "Are you okay?"
Man: "It's nothing to worry about."
Woman: "You really should trust me more."
Man: "Right..."
The rightmost portion contains The Girl and Dokutsuki standing side by side. The Girl is wearing her blue tank-top/purple skirt outfit from vignette 2, but Dokutsuki looks the same as she usually looks in-game. Neither have faces.
Transcript (interact with The Girl):
Girl: "You really shouldn't act that way, it'll drive people away, even me."
Dokutsuki: "I can't help it, it's just the way I am."
Girl: "What kind of excuse is that? I suppose that is enough for now. Haha, oh you❤"
Transcript (interact with Dokutsuki):
Dokutsuki: "I'm sorry, forgive me. Please forgive me..."
Girl: "You know, I always say that I'll forgive you."
Dokutsuki: "Right."
[When you leave the room, an extra message appears.]
Girl (narrating): "[...Great.]"
Vignette 6[]
This room is large, has dark green walls, ad the floor appears to be covered in blood. In the room's center stands two black figures, defiantly facing each other. Next to the left one is a (clean) knife - next to the right one, a pile of shattered green glass. Also in this room are two flipped tables and two black figures sprawled on the ground.
Girl(?) (narrating(?)): "I just want to get rid of them all. I want to get rid of her and her family."
"I shouldn't have made the mistake of being in her presence. Without her, I could've lived a normal happy life."
"[But do I really regret meeting her?]"
???: "Is that how I truly feel?"
[After this, the vignette ends. But there is nothing that can be interacted with.]
[Upon reentering this room's anteroom, a message appears.]
[Unknown]: "You may now advance..."
Vignette 7[]
This vignette's anteroom does not follow the pattern. There is no circular symbol, and no path northward. There is, however, a glowing dot back, and a path to the east, marked with a black piece of paper with a white dot. This leads to the final vignette.
The final vignette takes place in a small, dark room with the usual decor. In the center, a black figure brandishing a broken bottle stands over the body of The Girl, still dressed in the outfit from vignettes 2 and 5 (and with longer hair than usual).
Interacting with the figure only triggers a sound of shattering glass, but The Girl has something to say.
Girl: "I just wanted you to be happy ...so I protected you, even if it costed my life."
"But I guess you would know exactly why more than anyone, huh."
"...No hard feelings?"
"(She's not moving anymore...)"
[After this, a glowing dot appears to the right.]
[You can interact with Girl again for an extra message.]
Girl (narrating): "[I'm done with this.]"
Interact with the glowing dot to return to Dokutsuki.
Extra Room[]
After talking to the body of The Girl, the white figure blocking the detour in anteroom 4 disappears, granting you access.
The room beyond is small, with a green tile floor and the sky-print curtained walls. There are four NPCs in this room.
The first, in the top-left corner, is a girl facing the northern wall. She has black hair held in a ponytail with a red hairtie, black shoes, and a white dress with black speckles. Talking to her will make her turn to face you, revealing that she has one giant, red eye in place of a face.
White dress girl (labeled simply as "Girl"): "I trusted you. I trusted you."
The second, in the bottom-left corner, is a couple in an intimate pose. The man is positioned over the limp woman (who has an indeterminate red object on the floor beside her). Both have blue hair.
???: "Get off of me."
???: I'm sorry, but I won't."
The third, in the bottom-right corner, is The Girl, in her usual outfit. She has no face.
Girl: "I will always protect you. You are my special friend."
The fourth, in the center, is Dokutsuki. Once again, she is listed as "???".
Dokutsuki: "You know... I'm really grateful. But I wish you didn't have to go for me to realize exactly what I had."
Unusually, every part of this event except for the cutscenes can be triggered indefinitely.
Effects Guide - Version 0.02[]
Glass Shard[]
Glass Shard is like the knife effect in Yume Nikki. It is Dokutsuki's weapon and used to kill NPCs. It is located in Broken Glass World. Go through the brown door south of the Nexus door in Boom World. Interact with a box at the top left of the room. Go through the new door that appears, and interact with the bleeding severed hand next to the crying figure.
Skull[]
Skull is a purely cosmetic effect. It turns Dokutsuki's head into a rotted, yellow skull. It is found by interacting with a skull and bones in Boom World. It is located southwest of the Nexus door.
Bandages[]
Bandages is a purely cosmetic effect. It puts bloody bandages around Dokutsuki's head. It is located in the Hospital. To find this effect, go to Boom World. Enter the red building, go down the path and break the giant bottle by interacting with it. Navigate through the maze until you find a door to the Hospital. Take the only door here, the topmost door in the next room, the accessible door on the right side of this hallway, and a door up from here; navigate to the bottom-right corner of this corridor and enter this new series of rooms. You will be able to interact with a woman to get the effect, whereupon a Chaser will appear.
Voiceless[]
Voiceless is a purely cosmetic effect. It puts a gag around Dokutsuki's mouth. In Faces World (the second door in the Nexus), there are two gagged yellow faces with the word "WHAT" above them. Go between these faces and enter Words World. Interact with another gagged face in this world to receive this effect.
Clock-Head[]
Clock-Head makes Dokutsuki's head look like a clock and makes her body become a part of it. Her hands and feet become the hands of the clock. You can use this effect to see the true form of the blue wisps in this world. Also, this effect seem to make you capable of seeing the true form of some NPC's. You can find it in the Clocks area, found in the Library, which is accessed from the Airport. This effect is known to have a glitch that makes the Wake Up function disappear from the menu. Yikes!
Medusa[]
Medusa makes you look like the Gorgon Medusa. You can activate this effect using the SHIFT key and freeze NPCs. You can find it in the Medusa area after deactivating all the hands and talking to the woman statue in the Library area.